Payment gateway in an application
For integrating the payment gateway into a mobile application (hereinafter referred to as the Application), we recommend using the Mobile Checkout SDK. The SDK allows you to accept card payments, Google Pay and Apple Pay payments directly in a native app — without the need to open a browser or any web component. It provides secure card data entry, full 3D Secure support, and built-in protection of sensitive data.
Alternative integration via a web component
The payment gateway can also be integrated into a mobile or desktop application without the Mobile Checkout SDK — the approach is, in principle, equivalent to integration into a web environment and uses a standard API protocol.
In a web environment, it is possible to choose either a redirect to the payment gateway or displaying the payment gateway in an iframe. In mobile applications, the procedure is similar; however, the payment itself must be opened in a component designed for secure rendering of web content, typically using Chrome Custom Tabs for Android or SFSafariViewController for iOS, hereinafter referred to as “Web Content Display Components”.
The use of WebView is unsuitable from both a functionality and security perspective.
Alternatively, redirection to the payment gateway may be implemented via an Android Intent or by using Apple URL Schemes and Universal Links.
WebView
The use of WebView technology is strongly discouraged. WebView does not provide the full functionality of a web browser; as a result, the payment gateway and payment methods such as Apple Pay and Google Pay will not function correctly. This limitation applies in particular to Android WebView and WKWebView for iOS.
Components with full web browser functionality must be used, specifically Chrome Custom Tabs for the Android platform and SFSafariViewController for the iOS platform.
Display in a Mobile Application
For the Android platform, the Chrome Custom Tabs component is used, while for the iOS platform the SFSafariViewController component is used; both are hereinafter referred to as “Web Content Display Components”.
The web content display component should occupy as large a portion of the screen as possible to ensure sufficient space for the payment process and to maximise user comfort.
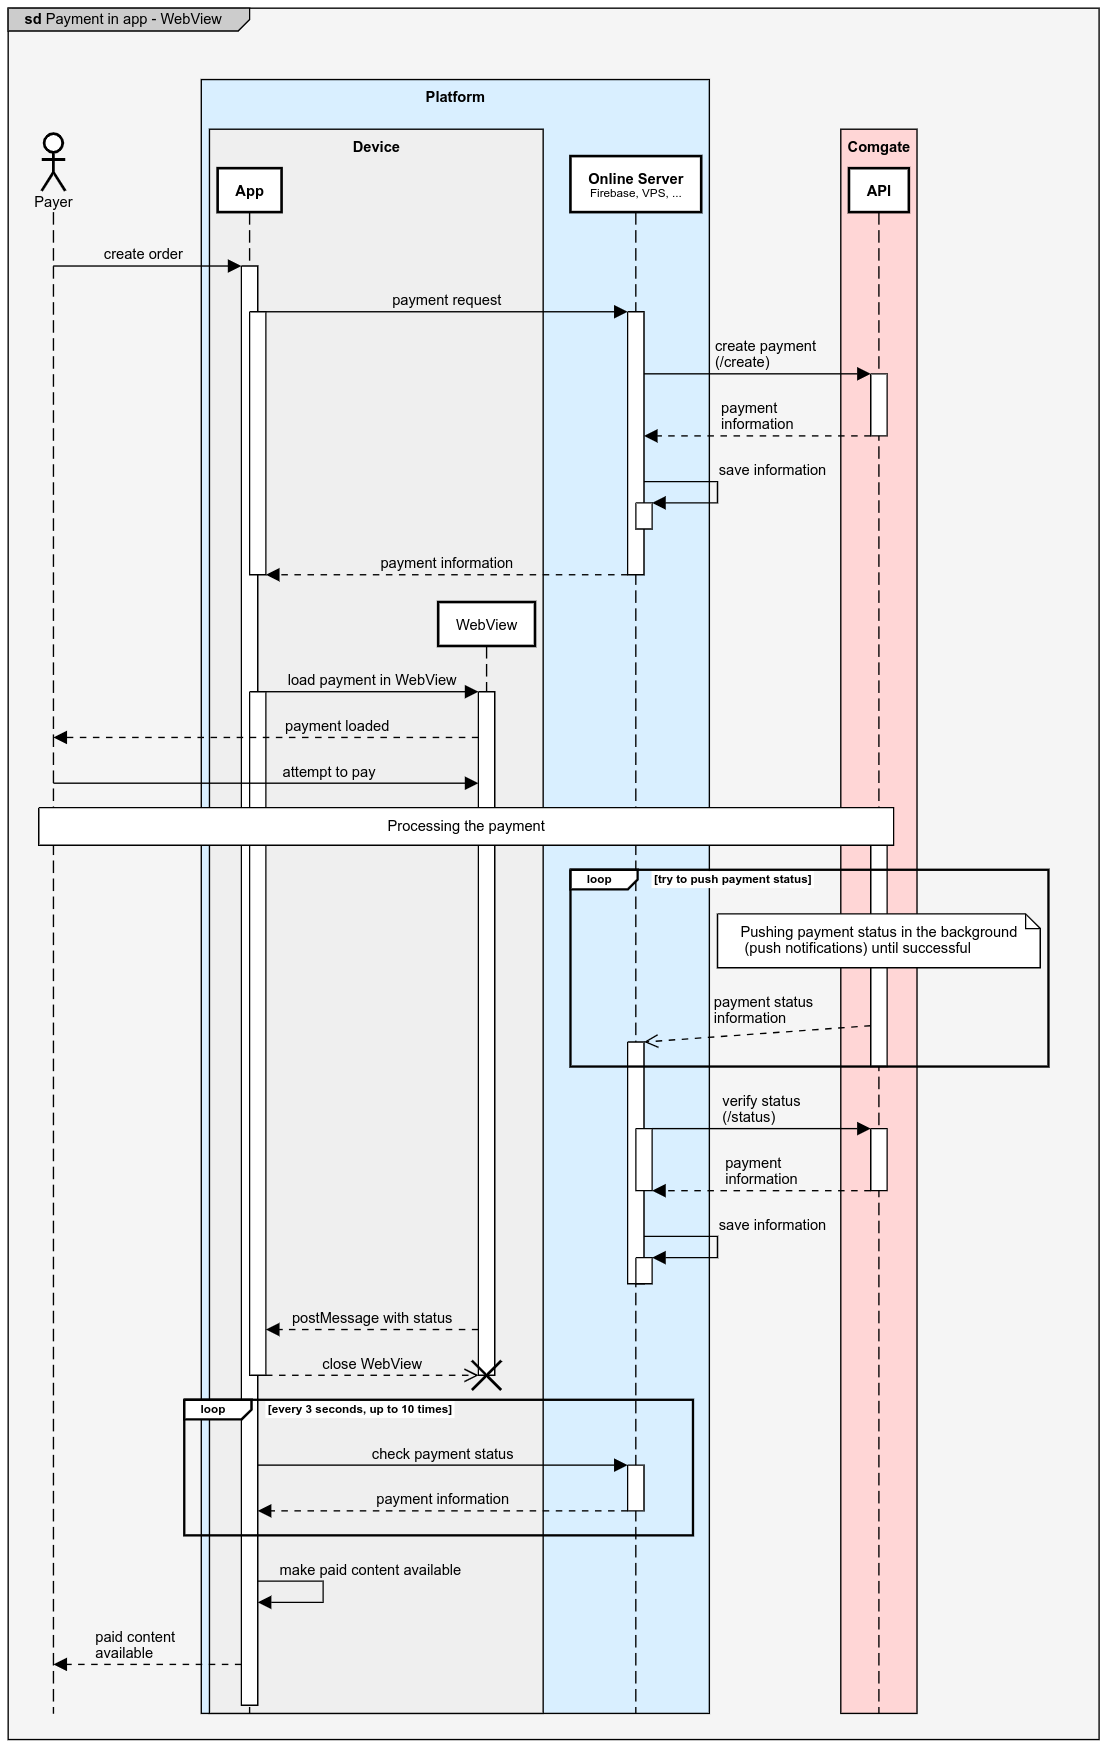
Payment Processing Flow
- The Application contacts its Server and creates an order.
- The Server performs an HTTP request to the Comgate API (/create) and creates a payment. The Comgate API response contains information about the created payment.
- The Server stores the received data and passes it to the Application (examples of query string parsing in PHP, JavaScript, Kotlin, Java, and Swift).
- The Application creates a Web Content Display Component covering as much of the screen as possible and loads the payment gateway URL into it (the
redirectparameter). - The payment gateway is displayed to the payer.
- During the payment process, a payment status monitoring mechanism (status watcher) is started, the purpose of which is to synchronise the payment status from the Server to the Application as quickly as possible. The following methods are available:
- Polling – short, repeated requests to the Server (typically every ~3 seconds),
- Long polling – the Server keeps the request open until data becomes available or a timeout occurs; if the status is unknown, the request is repeated,
- WebSocket – a fully duplex communication channel enabling the Server to send payment status updates in real time.
- The payer completes the payment.
- After the payment is completed, the Server is informed of the payment status change via a Push notification and stores this information.
- The Server verifies the payment status by querying the Comgate API (/status):
- if the payment is not confirmed as paid, the query is repeated approximately every 3 seconds; after roughly 10 attempts (approximately 30 seconds), it is advisable to stop polling and continue in the background at an interval of approximately 30 minutes,
Extra attention
In some cases, payment processing may take until 12:00 on the following business day.
- further query repetition logic is governed by the payment statuses.
- if the payment is not confirmed as paid, the query is repeated approximately every 3 seconds; after roughly 10 attempts (approximately 30 seconds), it is advisable to stop polling and continue in the background at an interval of approximately 30 minutes,
- The payment gateway displayed within the Web Content Display Component detects a successful payment:
- immediately before redirection, a post message is sent, which can be intercepted to hide the Web Content Display Component,
- alternatively, the payer is redirected to a URL defined in the merchant connection settings; the Application should react to this URL and hide the Web Content Display Component.
- The Application contacts its Server and verifies the final payment status.
- The Application grants the payer access to the paid service.
Sequence Diagram
How to detect the moment to hide the Web Content Display Component
As described in step 10, there are two primary mechanisms by which it can be determined that the payment has been completed and the Web Content Display Component can be hidden:
- interception of the received post message,
- redirection of the payer to the URL defined in the merchant connection settings.
Post message
Immediately before the payer is redirected away from the payment gateway, a post message containing information about the payment status is sent. This message can be intercepted and used to trigger hiding of the Web Content Display Component.
Structure of the post message:
{
   "value":{
      "id": "XXXX-XXXX-XXXX",
      "status": "PAID", // PAID, CANCELLED, AUTHORIZED, PENDING
      "refId": "hodnota-refId"
   },
   "scope": "comgate-to-eshop",
   "action": "status"
}
When processing a post message, it must always be verified that the scope value equals "comgate-to-eshop" and the action value is "status". All other post messages must be ignored.
At the same time, it must be emphasised that the payment status obtained via a post message is not considered trustworthy. The actual payment status must always be verified by querying the Comgate API.
Payer redirection
Alternatively, after completion of the payment process, the payer may be redirected to a URL of the merchant’s own Server. In this case, the Application must automatically detect this redirection and, based on it, hide the Web Content Display Component.
The redirection URLs can be configured in the client portal or defined when creating the payment via the API:
- Paid URL (
url_paid) – for successfully paid payments (PAID,AUTHORIZED), - Cancelled URL (
url_cancelled) – for cancelled or expired payments (CANCELLED), - Pending URL (
url_pending) – for payments in progress (PENDING), - Payment result handover URL – configured exclusively in the client portal as part of the merchant connection settings.
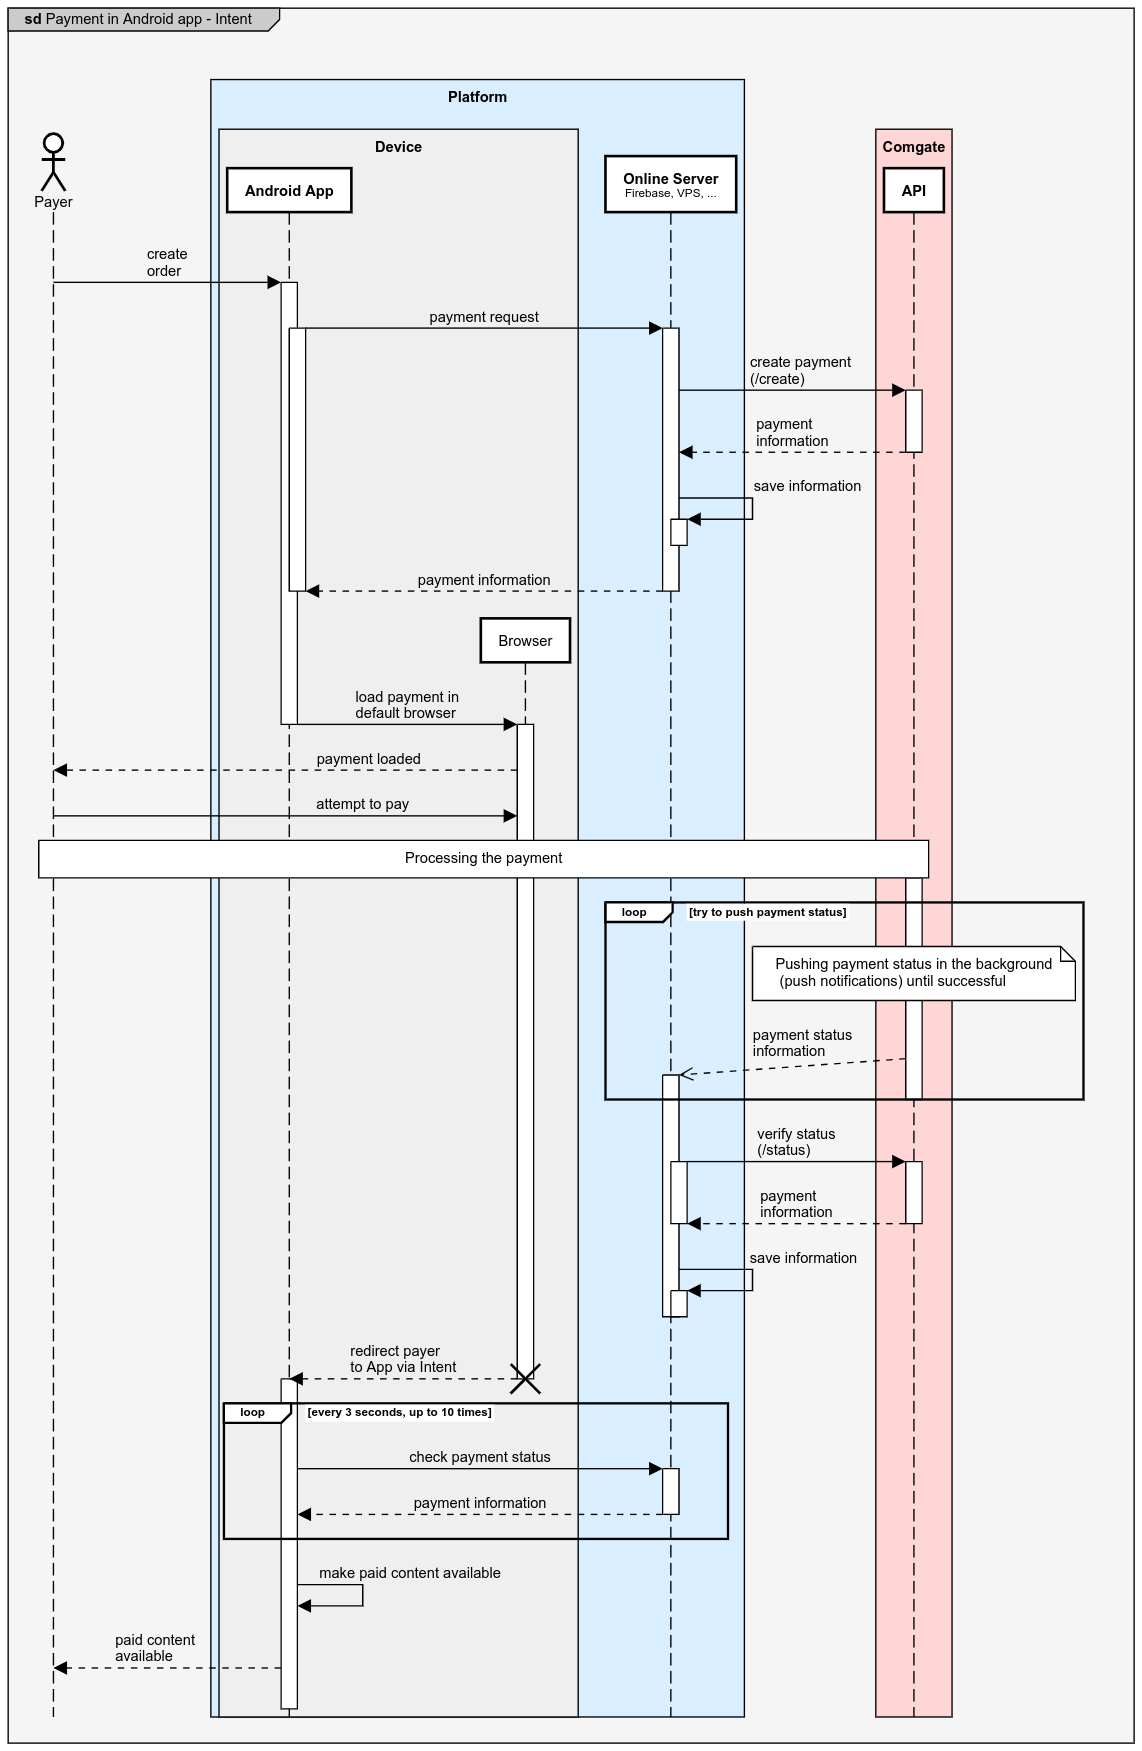
Android Intent
Comgate also supports integration of returns from the payment gateway using an Intent. The advantage of this approach is that it is not necessary to implement a Web Content Display Component; the payment is displayed in the default browser, which subsequently returns focus to the application.
Payment Processing Workflow
- The Application contacts its Server and creates an order.
- The Server sends an HTTP request to the Comgate API (/create), initiating the payment. The Comgate API responds with payment information.
- The Server stores the information received from the Comgate API and forwards it to the Application (how to parse the query string in PHP, JavaScript, Kotlin, Java, and Swift).
- The Application opens the payment in the payer's default browser (using the payment gateway URL from the "redirect" parameter), causing the Application to lose focus.
- The payer accesses the payment gateway in the default browser.
- The payer completes the payment.
- Once the payment is completed, the Server is notified of the new payment status via Push Notification. The Server stores this information.
- The Server verifies the payment status by requesting the Comgate API (/status) to confirm the payment.
- If the payment is not confirmed, it retries approximately every 3 seconds. After 10 retries (about 30 seconds), the retry attempts should stop, and the Server should be requested in the background every 30 minutes.
Extra attention
In some cases, payment processing may take until 12:00 PM on the next business day.
- Retry attempts can continue based on the payment statuses.
- If the payment is not confirmed, it retries approximately every 3 seconds. After 10 retries (about 30 seconds), the retry attempts should stop, and the Server should be requested in the background every 30 minutes.
- The payer is redirected back to the Application, which regains "focus".
- The Application contacts its Server to verify the payment status.
- The Application grants access to the paid service.
Sequence Diagram
Configuring Return URIs for Intents
Currently, Android Intents can only be used as parameters when creating a payment through the Comgate API (/create). These parameters include:
url_paid- URI to redirect the payer after the payment is completed,url_cancelled- URI to redirect the payer after the payment is cancelled,url_pending- URI to redirect the payer if the payment is still pending.
The payment gateway will then attempt to use this Intent in the default browser to redirect the payer back to your application.
Android Intents cannot currently be configured in the client portal.
Android Intent Format
Any Intent format can be used. Very often, we encounter the general notation in the form of:
intent://host/path?transactionId=XXXX-XXXX-XXXX&status=PAID#Intent;package=com.example.package;end
More specific Intents can also be used, such as:
myapp://payment/success?transactionId=XXXX-XXXX-XXXX&status=PAID
In both cases, Intents are closely tied to a specific application. Their functionality must be implemented within an application itself.
Apple URL Schemes and Universal Links
Apple provides mechanisms on its devices that allow applications to efficiently handle redirections. These mechanisms include URL Schemes and Universal Links.
URL Schemes
Custom URL schemes enable applications to register unique links that the payment gateway can use to redirect users back to the application.
myapp://payment/success?transactionId=XXXX-XXXX-XXXX&status=PAID
Universal Links
Universal Links are standard HTTP/HTTPS links that automatically open the application. This mechanism is preferred due to better security and user-friendliness.
https://example.com/payment/success?transactionId=XXXX-XXXX-XXXX&status=PAID
Return URLs
When setting up payments via the Comgate API, it is possible to define return URLs that determine where the user will be redirected in various scenarios:
url_paid: Redirect after a successful payment (PAID,AUTHORIZED)url_cancelled: Redirect after a cancelled or expired payment (CANCELLED)url_pending: Redirect for pending payments (PENDING)
Return URLs in the Universal Links format can be defined either through the Comgate API or in the client portal.
URL Schemes can currently only be configured via the Comgate API.