Google Pay
The library includes SecureGooglePayButton, which simplifies Google Pay integration in your app. The component automatically:
- checks Google Pay availability on device,
- displays the standard Google Pay button,
- processes payment flow and obtains payment token,
- sends token to payment gateway for processing.
Using Google Pay requires Checkout API activation and correct setup in Google Play Console and Google Pay Console, described below. Full documentation for native integration without SDK is available in Google Pay - Mobile apps.
1. Google Play Console
Before deploying Google Pay in production app version, app must be configured correctly and published in Google Play. This step is required by Google and is necessary to activate Google Pay in compliance with their terms.
App configuration, upload, and management are done in Google Play Console. Your app must be available at least in internal or closed testing. Full release is also possible.
This documentation does not include detailed Google Play Console setup instructions. The process can be extensive and depends on your situation, so follow official Google guidance.
During development, also consider additional Google requirements related to publishing an app with Google Pay.
2. Google Pay Console
Once app is available at least in internal testing, review approval requirements in Google Pay Console. This step is necessary for production Google Pay activation.
Full registration/configuration process is described in official docs.
Approval process may take several days and requires compliance with:
- brand guidelines,
- UX best practices,
- requirements in integration checklist.
Part of approval process is also providing screenshots of your Google Pay implementation.
At this stage, it is enough to get access to Google Pay Console and verify that your app configured in Google Play Console appears in "Google Pay API" section.
Submitting approval request is described later, after integration is finished.
3. Implementation
This section describes library components required to integrate Google Pay into your app.
The library automatically handles payment gateway configuration, payment request assembly, token extraction, and API submission. You only need to use SecureGooglePayButton and pass required parameters.
Requirements
| Requirement | Description |
|---|---|
googleMerchantId | Google Pay Merchant ID - required for production. |
googleMerchantName | Merchant name displayed in Google Pay dialog (optional). |
threeDSConfig | ThreeDSConfig instance passed to ComgateSecureSession (required also for Google Pay). |
| Checkout API activation | Google Pay configuration is loaded internally by the library during session initialization. |
How to obtain googleMerchantId
You can obtain googleMerchantId in Google Pay & Wallet Console in your merchant profile detail.
Quick steps:
- Open Google Pay & Wallet Console.
- Select your Merchant profile (or create a new one).
- In integration details section, copy Merchant ID value.
- Use this value as
googleMerchantIdinComgateSecureSession.
SecureGooglePayButton
Jetpack Compose
import cz.comgate.sdk.compose.*

SecureGooglePayButton(
	session = session,
	onPaymentResult = { result -> handleResult(result) },
	paymentParamsProvider = {
		PaymentParams(
			email = "customer@example.com",
			price = 100,
			curr = "CZK",
			country = "CZ",
			label = "Payment name",
			refId = "ref-123",
			fullName = "John Smith"
		)
	},
	modifier = Modifier
		.fillMaxWidth()
		.height(56.dp)
)
Button appearance setup
SecureGooglePayButton now supports customizing the Google Pay button appearance and type.
Styling methods
| Method | Parameter | Description |
|---|---|---|
setButtonTheme(theme) | GooglePayButtonTheme | Sets visual variant (DARK, LIGHT). |
setButtonType(type) | GooglePayButtonType | Sets button label type. |
setCornerRadius(radiusDp) | Int | Sets corner radius in dp. |
SecureGooglePayButton(
	session = session,
	onPaymentResult = { result -> /* ... */ },
	paymentParamsProvider = { /* ... */ },
	modifier = Modifier.fillMaxWidth().height(56.dp),
	update = {
		setButtonTheme(GooglePayButtonTheme.LIGHT)
		setButtonType(GooglePayButtonType.CHECKOUT)
		setCornerRadius(12)
	}
)
XML attributes
| XML attribute | Format | Description |
|---|---|---|
app:gpButtonTheme | enum | Visual button variant: dark (default), light. |
app:gpButtonType | enum | Button label type: book, buy, checkout, donate, order, pay (default), plain, subscribe. |
app:gpButtonCornerRadius | dimension | Button corner radius (default: 8dp). |
Setup
setup() links button with session and payment parameters:
SecurePayButton(Compose) usesActivity.SecureGooglePayButton(Compose) requiresFragmentActivity(or subtype, for exampleAppCompatActivity).
@Composable
private fun PaymentScreen(session: ComgateSecureSession) {
	SecureGooglePayButton(
		session = session,
		onPaymentResult = { result ->
			// Handle payment result
		},
		paymentParamsProvider = {
			PaymentParams(
				email = "customer@example.com",
				price = 100,
				curr = "CZK",
				label = "Payment name",
				refId = "ref-123",
				fullName = "John Smith",
				country = "CZ"
			)
		},
		modifier = Modifier
			.fillMaxWidth()
			.height(56.dp)
	)
}
Automatic session binding
After gpButton.setup(...), the button automatically binds to ComgateSecureSession.
As soon as session finishes initialization and contains Google Pay configuration, button checks Google Pay availability on device and shows itself when available.
val session = ComgateSecureSession(
	checkoutId = "your-checkout-id",
	context = applicationContext,
	threeDSConfig = ThreeDSConfig(),
	lifecycleOwner = this,
	onInitialized = { result ->
		result.onFailure { e ->
			Toast.makeText(this, "Error: ${e.message}", Toast.LENGTH_LONG).show()
		}
	}
)
In examples above, this (activity) is passed as lifecycleOwner. If you create session inside a Fragment, pass viewLifecycleOwner instead. This binds session to view lifecycle and prevents memory leaks:
- Activity:
lifecycleOwner = this - Fragment:
lifecycleOwner = viewLifecycleOwner(notthis- Fragment survives view recreation)
PaymentParams
Google Pay payment parameters use the same PaymentParams object as card payments. Full parameter description is in Card Data - PaymentParams.
ComgateSecureSession configuration
For Google Pay, pass googleMerchantId (production) and optionally googleMerchantName in ComgateSecureSession constructor:
val session = ComgateSecureSession(
	checkoutId = "your-checkout-id",
	context = applicationContext,
	googleMerchantId = "your-google-pay-merchant-id",  // Required for production
	googleMerchantName = "Store name",                  // Optional
	threeDSConfig = ThreeDSConfig(),                     // Required also for Google Pay
	lifecycleOwner = this
)
Complete example
class PaymentActivity : AppCompatActivity() {

	private lateinit var session: ComgateSecureSession

	override fun onCreate(savedInstanceState: Bundle?) {
		super.onCreate(savedInstanceState)

		// 1. Create session with Google Pay configuration
		session = ComgateSecureSession(
			checkoutId = "your-checkout-id",
			context = applicationContext,
			googleMerchantId = "your-google-pay-merchant-id",
			googleMerchantName = "Store name",
			threeDSConfig = ThreeDSConfig(),
			lifecycleOwner = this,
			onInitialized = { result ->
				result.onFailure { e ->
					Toast.makeText(this, "Error: ${e.message}", Toast.LENGTH_LONG).show()
				}
			}
		)

		// 2. Setup Compose UI
		setContent {
			MaterialTheme {
				Surface(modifier = Modifier.fillMaxSize()) {
					GooglePayScreen(session)
				}
			}
		}
	}
}

@Composable
private fun GooglePayScreen(session: ComgateSecureSession) {
	var resultText by remember { mutableStateOf("") }

	Column(modifier = Modifier.fillMaxSize().padding(16.dp)) {
		// Google Pay button
		SecureGooglePayButton(
			session = session,
			onPaymentResult = { result ->
				resultText = when (result) {
					is PaymentResult.Paid -> "Payment successful"
					is PaymentResult.Pending -> "Payment is processing..."
					is PaymentResult.Cancelled -> "Payment rejected: ${result.errorReason}"
					is PaymentResult.Failed -> "Error: ${result.error.message}"
					else -> ""
				}
			},
			paymentParamsProvider = {
				PaymentParams(
					email = "customer@example.com",
					price = 100,
					curr = "CZK",
					label = "Order #123",
					refId = "order-123",
					fullName = "John Smith",
					country = "CZ"
				)
			},
			modifier = Modifier.fillMaxWidth().height(56.dp)
		)

		if (resultText.isNotEmpty()) {
			Text(text = resultText, modifier = Modifier.padding(top = 8.dp))
		}
	}
}
Combining with card payment
Google Pay button can be easily combined with card form on one screen. Both components share the same ComgateSecureSession:
class PaymentActivity : AppCompatActivity() {

	private lateinit var session: ComgateSecureSession

	override fun onCreate(savedInstanceState: Bundle?) {
		super.onCreate(savedInstanceState)

		// Session for both payment types
		session = ComgateSecureSession(
			checkoutId = "your-checkout-id",
			context = applicationContext,
			googleMerchantId = "your-google-pay-merchant-id",
			googleMerchantName = "Store name",
			threeDSConfig = ThreeDSConfig(),  // Required also for Google Pay
			lifecycleOwner = this
		)

		setContent {
			MaterialTheme {
				Surface(modifier = Modifier.fillMaxSize()) {
					CombinedPaymentScreen(session)
				}
			}
		}
	}
}

@Composable
private fun CombinedPaymentScreen(session: ComgateSecureSession) {
	val panState = rememberSecurePanFieldState()
	val expiryState = rememberSecureExpiryFieldState()
	val cvvState = rememberSecureCvvFieldState()
	val statusState = rememberPaymentStatusState()

	val collector = rememberSecureDataCollector(panState, expiryState, cvvState)

	Column(modifier = Modifier.fillMaxSize().padding(16.dp)) {
		// Card form
		SecurePanField(state = panState, modifier = Modifier.fillMaxWidth())
		Spacer(modifier = Modifier.height(8.dp))
		SecureExpiryField(state = expiryState, modifier = Modifier.fillMaxWidth())
		Spacer(modifier = Modifier.height(8.dp))
		SecureCvvField(state = cvvState, modifier = Modifier.fillMaxWidth())
		Spacer(modifier = Modifier.height(12.dp))

		SecurePayButton(
			session = session,
			collector = collector,
			onPaymentResult = { result -> statusState.showStatus(result) },
			paymentParamsProvider = { /* ... */ },
			modifier = Modifier.fillMaxWidth()
		)

		HorizontalDivider(modifier = Modifier.padding(vertical = 16.dp))

		// Google Pay
		SecureGooglePayButton(
			session = session,
			onPaymentResult = { result -> statusState.showStatus(result) },
			paymentParamsProvider = { /* ... */ },
			modifier = Modifier.fillMaxWidth().height(56.dp)
		)

		SecurePaymentStatusView(
			state = statusState,
			modifier = Modifier.fillMaxWidth().padding(top = 8.dp)
		)
	}
}
When using Google Pay in Mobile Checkout SDK, always create and pass threeDSConfig to ComgateSecureSession.
4. Submit approval request
To activate Google Pay in production mode, you must submit approval request through Google Pay Console. This is required to make payments available to real payers and to comply with Google requirements.
Integration checklist
Before submitting, go through integration checklist and verify integration behavior. Google does not perform strict item-by-item checklist validation. With Comgate-based integration, not all checklist requirements can be fulfilled. Still, we recommend verifying at least key points.
The table below summarizes requirements that either cannot be fulfilled with Comgate integration or are optional:
| Section | Test | Feasibility | Explanation |
|---|---|---|---|
| Basics | If you complete a DIRECT tokenizationSpecification type integration... | Not possible | The library integrates through payment gateway.
Direct integration (DIRECT) is not supported. |
| Functional tests | If you require a shipping address... | Optional | Address is not processed on Comgate side. |
| If you require a telephone number... | Optional | Phone number is not processed on Comgate side. |
SecureGooglePayButton handles all payment gateway configuration internally (tokenization, gateway identifier, etc.). When going through checklist, focus mainly on UX, button usage, and overall app behavior.
Request guide
Before submitting approval request, prepare all required application screenshots.
Google requires screenshots showing these situations:
- user is viewing an item or service,
- user is ready to complete purchase,
- user selected Google Pay as payment method,
- user sees payment details stored in Google Pay (we recommend taking this photo with another device),
- purchase was completed successfully.
Exact wording of requirements is available at the bottom of request form in Google Pay Console.
- Sign in to Google Pay Console and select the merchant profile under which Google Pay payments will run.
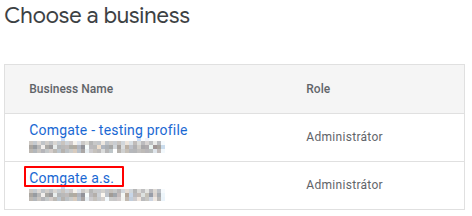
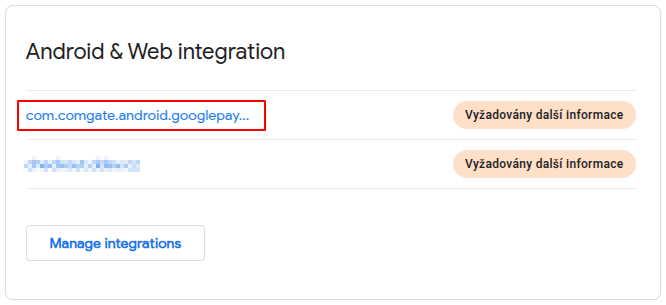
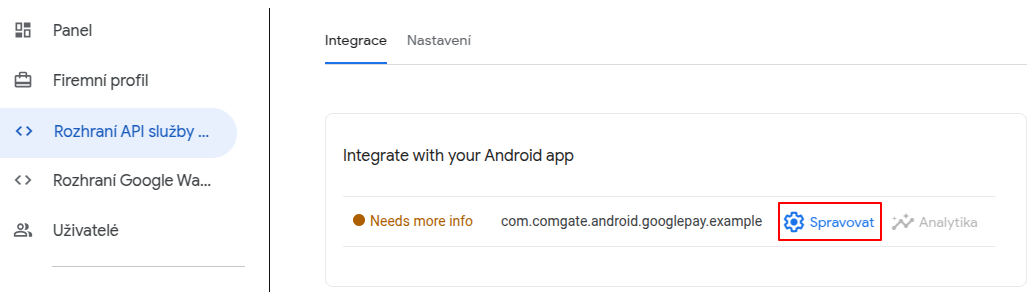
- On home page (or in left menu under Google Pay API -> Integrate with your Android app), choose app for which approval request should be submitted.
- Selection from home page
- Selection from left menu
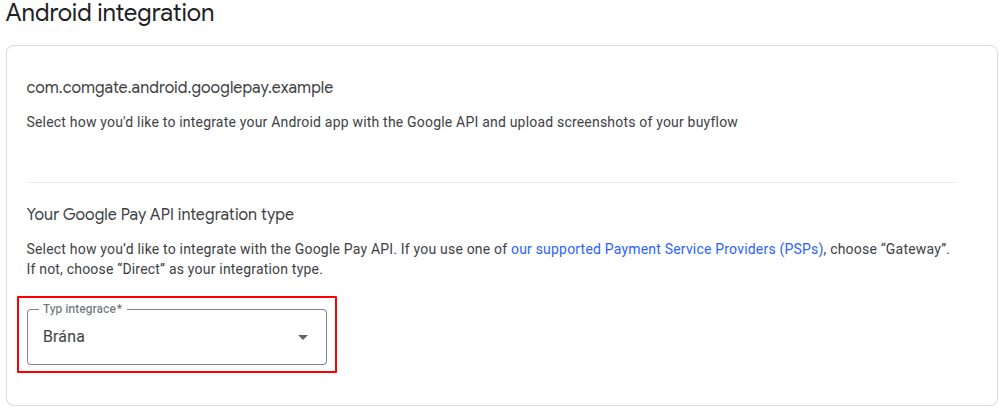
- In request form, in Your Google Pay API integration type section, select Gateway.
- Upload all prepared screenshots demonstrating correct Google Pay behavior in your app.
Some form categories may contain the same screenshots, depending on your checkout design.

-
After filling all required fields, click Save.
-
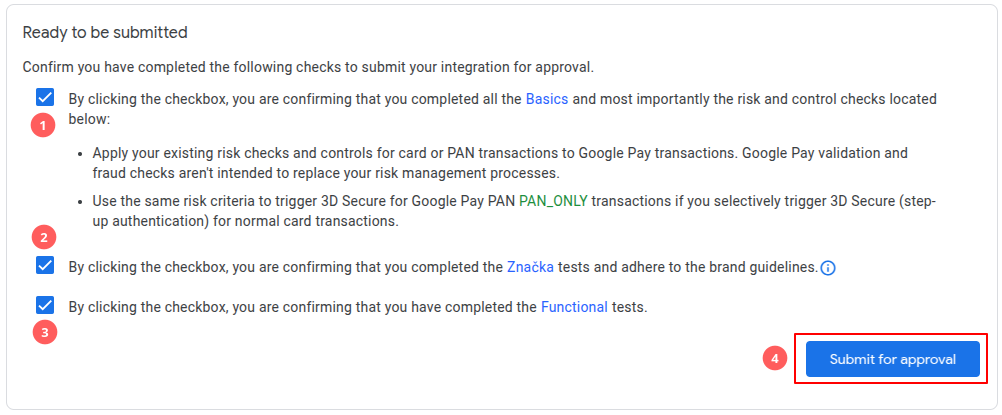
If form saves successfully and has no errors, a new section for request submission appears at top of page. Verify all requirements are met, confirm by checking relevant checkboxes, and click Submit for approval.
After submission, Google Pay support reviews your app. If successful, integration is approved. Otherwise, you receive email with instructions on what to fix. Approval process may take several days.
In some cases, Google Pay support may not respond for a longer period. We recommend waiting at least 5 business days (US calendar), then contacting support to ask about request status.
Contact support option is available in Google Pay Console left menu.
- Once app is approved, you receive confirmation email. Approval is also visible in Google Pay Console, where app will be marked as "Active". You can now switch
devModeinComgateSecureSessiontofalse(or omit it) to activate production mode.

5. Test environment
Compared to Apple Pay integration, Google Pay testing is significantly simpler. For testing, you must use a physical device with Google Wallet enabled.
As a development supplement, you can also use Android emulator in Android Studio. However, emulator supports only limited features, for example Google Pay button display.
Test vs production mode
Library automatically switches Google Pay between test and production environments based on devMode in ComgateSecureSession:
devMode | Google Pay environment | Description |
|---|---|---|
true | WalletConstants.ENVIRONMENT_TEST | Test cards, no real transactions. |
false (default) | WalletConstants.ENVIRONMENT_PRODUCTION | Real payments - requires approved app in Google Pay Console. |
During development and testing, always set devMode = true. Production payments are available only after app approval in Google Pay Console and installation via Google Play, including internal testing track.
Physical Android device
For full Google Pay testing, we recommend using a real device. Device must be signed in to any Google account and support Google Wallet.
-
Prepare the device
- Ensure latest Android version is installed.
- Sign in with Google account used for testing.
- Prepare USB cable to connect device to your computer.
-
Enable developer mode
- Activation steps differ by manufacturer and Android version. Follow official docs or manufacturer instructions.
- Enable USB debugging and permission for installation from unknown sources.
-
Test cards
- If
devModeistrue, test cards appear automatically after tapping Google Pay button. - These cards cannot be used for real transactions and are only for integration verification.
- Details are in official Google docs.
- If
-
Run app on device
- To run app on connected test device, follow official Android Studio guide.
-
Test payment
- After app starts, tap Google Pay button.
- If everything is configured correctly, test card picker appears.
- Transaction is simulated - no real charge occurs.
If Google Pay does not appear, check:
devModeis set totrueinComgateSecureSession,gpButton.setup(...)was called onSecureGooglePayButton,- correctness of
PaymentParams, - Google Wallet support on device.
Android emulator
Android emulator supports Google Pay only in limited scope. You can test button visibility and basic UI. Completing payment or obtaining payment token is not possible. For token generation testing, always use physical Android device.
Running app in emulator is described in official documentation.
Encrypted payment token cannot be obtained on Android emulator. This is an intentional limitation by Google.