Configuration
For the Checkout SDK to function correctly, the shop in the Comgate system must be configured and the domains must be verified for the individual payment methods. The shop connection through which payments are created and processed must also be properly set up.
Before starting the configuration, it is necessary to carefully consider which services will be operated through Checkout.
Currently, only the following services are available:
- Apple Pay
- Google Pay
Sections of the tutorial that concern services you do not require can be skipped during the integration.
Creating a shop
Our customer support will be happy to assist you with signing the payment service agreement and creating a shop.
Configuration in the client portal
To start configuring the shop, log in to the Comgate client portal using a profile that has sufficient permissions to manage the integration of the shop on which the Checkout SDK will be implemented.
Activating Checkout SDK
Activation is very simple — just follow these steps:
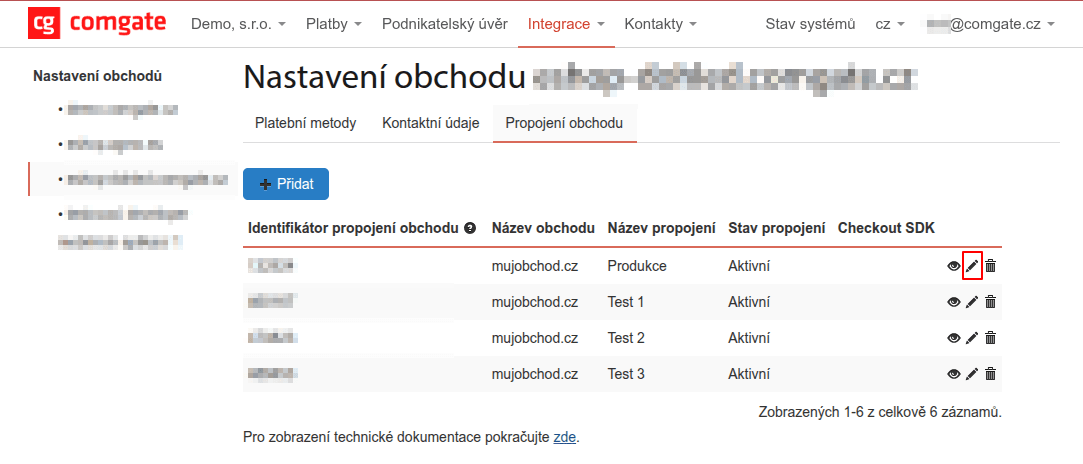
- In the top menu, select Integration and in the Shop settings section, select the shop for which you want to activate the Checkout SDK.
- At the top of the page, select the Shop connection tab and then select the connection from the list through which you want to operate the Checkout SDK.
We recommend creating a new shop connection for each integration. Google Pay and Apple Pay domain verification takes place only on the first activation of the Checkout SDK on the given shop. Any further connections take over the configuration from the shop.
- Find the Checkout SDK item and click on it.
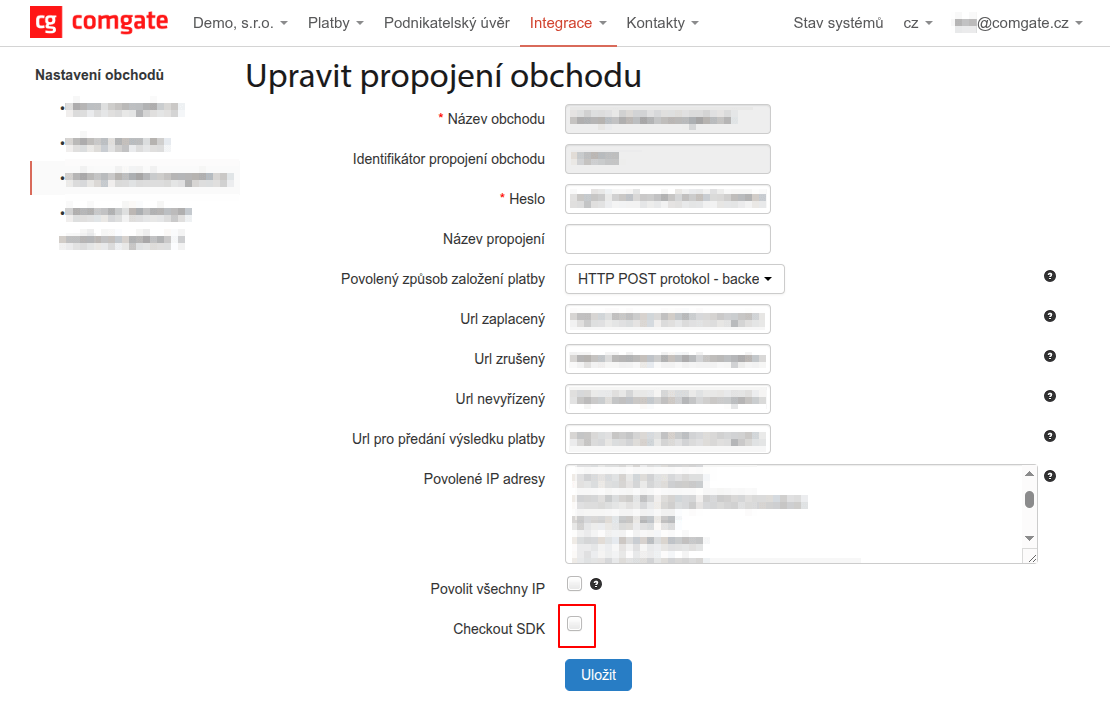
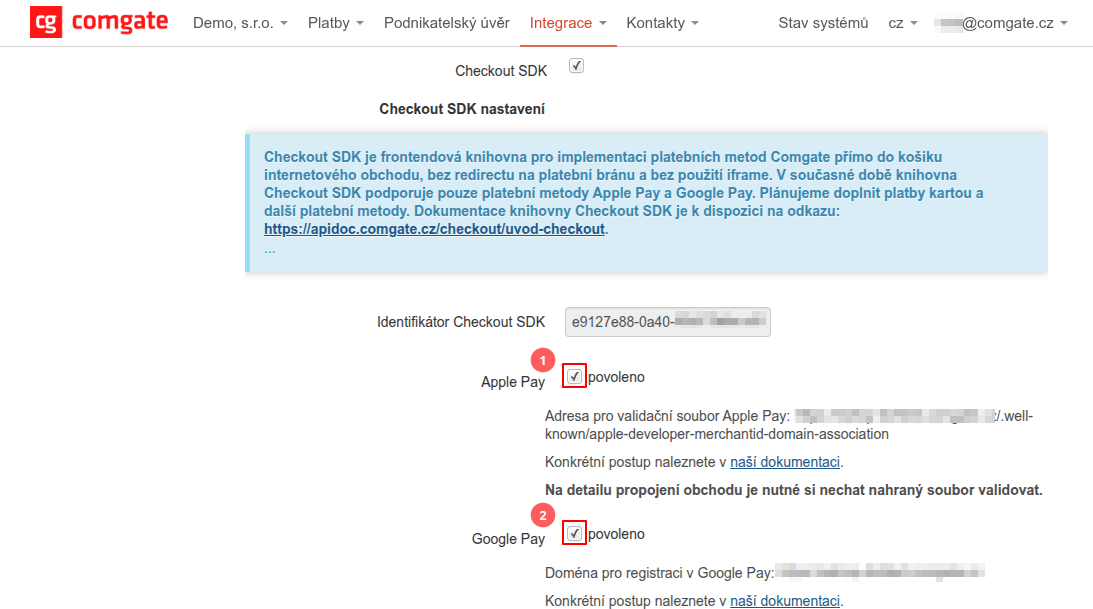
- Additional settings for Checkout SDK will be expanded. In this section, enable all the services you want to operate through the Checkout SDK.
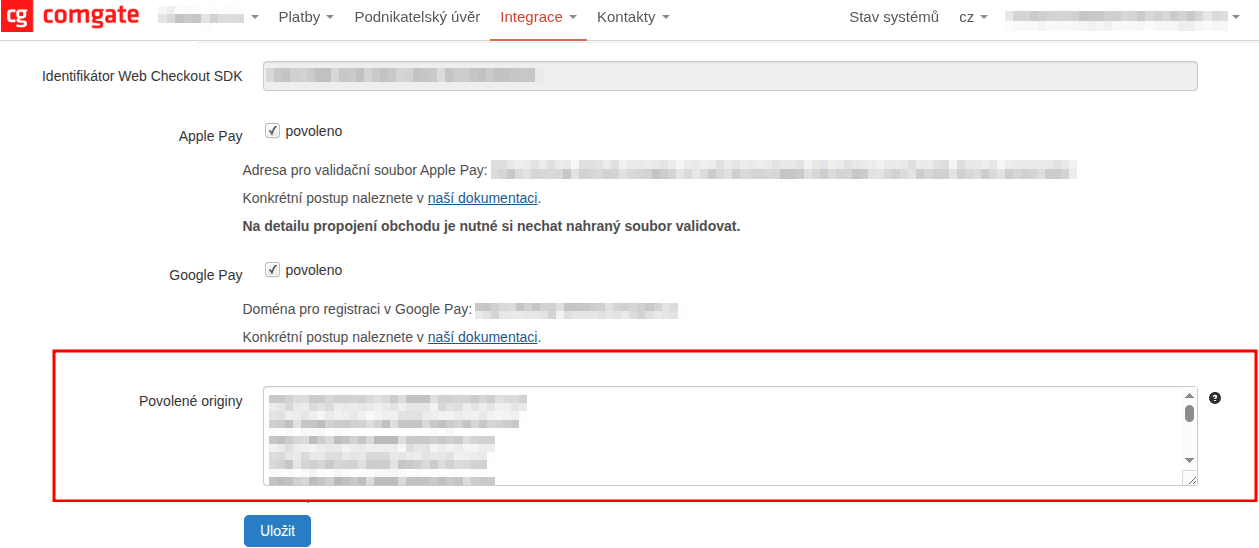
- In the Allowed origins field, fill in all the origins on which the Checkout SDK will be operated — including development and test ones. Each origin is listed on a separate line. Lines starting with the
#character are considered comments and are ignored.
Example:
# production
https://www.your-eshop.com

# or a comment can also be on the same line after the origin
# (separated by the first space)
https://test.your-eshop.com test environment
The Checkout SDK will only work on the origins listed in this field. If the origin is missing, the payment interface will not load.
- Click the Save button.
This completes the configuration and it is ready for any domain verification if verification has not already been done for the given shop within another connection.
Obtaining checkoutId
To use the Checkout SDK, you need to obtain the checkoutId value, which is used to uniquely identify the shop connection:
- Go to the list of shop connections, see steps 1 and 2 above in the Activating Checkout SDK section.
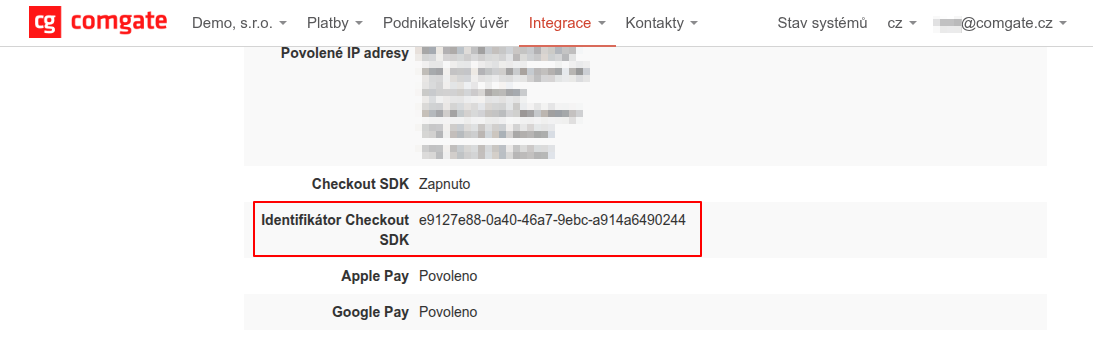
- In the list of shop connections, find the desired connection and click the eye symbol to display the detail.
- On the detail page, scroll down and find the Checkout SDK identifier item (it will be in UUIDv4 format).
The Checkout SDK identifier value should be recorded for further use (or you need to know where to find it again).
Domain verification
Every service that processes payment data requires verification of the domain on which it operates. The conditions of this verification are determined by the service provider and Comgate cannot influence them in any way.
Perform verification only for services that are to be used. If you do not perform the verification now, it can be done at any time later. Without verification, the given service will not be functional in production.
Apple Pay
For Apple Pay to work correctly, verification of the domain on which the service operates is required. This verification is mandatory even for development and test environments, which is somewhat of a problem.
Specific behavior outside of production
Apple Pay has excellent support among payment gateways, but Apple itself complicates local development.
To display the Apple Pay interface, the site must run over HTTPS and the domain must be verified with Apple via a well-known file and registration. In production this is not a problem – HTTPS is the standard and the verification file is uploaded in a moment.
During development, the situation is more complicated. A local server on localhost does not support Apple Pay and attempting to register localhost:8080 will fail. The button will display after starting via HTTPS, but a payment – even a test one – cannot be made. The domain must always be registered with Apple.
Source: https://medium.com
At present, it is not possible to fully test Apple Pay on localhost. The target point of the Web Checkout SDK integration is only to achieve the display of the button; the payment flow itself can only be tested in the production environment.
Verifying the production domain
Apple requires a special apple-developer-merchantid-domain-association file for domain verification. This file must be placed in the website's file structure and made available at a precisely defined URL.
The verification file can be downloaded via the Merchant API from the endpoint
/v2.0/appleDomainAssociation. To access the API, use the merchant and secret credentials from the connection for which Checkout SDK was enabled in the previous steps.
What to do if the appleDomainAssociation endpoint returns the error "Only one card method is allowed."?
This situation only occurs if two different card methods are activated simultaneously for the shop. In such a case, the system cannot determine which validation file to return and marks the state as a collision.
This is a very specific and rare scenario, for which it is not yet practical to prepare a universal guide. It is more efficient to resolve it individually through support.
In the event of this occurring, contact support. They will either directly resolve the problem or forward it to the responsible specialists.
Validation file
After downloading the validation file, it is necessary to upload it to your domain or subdomain. For verification to work, the file must be available, for example, at the address:
https://www.your-eshop.com/.well-known/apple-developer-merchantid-domain-association. This will allow Apple Pay to operate on https://www.your-eshop.com/.
If Apple Pay should also be available on other subdomains, you must follow the same procedure for each of them separately and make the validation file accessible, for example on the subdomain https://checkout.your-eshop.com/.well-known/apple-developer-merchantid-domain-association
In the endpoint response, only the file content is returned. The downloaded content must be saved to the file named above on disk and uploaded to the server unchanged. The file must not contain a line break at the end! The content consists of only one line. The file encoding must be ASCII or UTF-8.
Any inconsistency with the requirements for the file's properties will result in the file being rejected by Apple's systems.
The file content changes at certain intervals. Although changes do not occur often, it is recommended to implement an automatic refresh mechanism. The update should take place at least once a day, ideally in the morning hours before the order peak begins, to avoid potential payment issues.
⚠️ Comgate is not responsible for the inability to make payments in the event that the validation file on the merchant's domain is not updated in time.
Correct upload of the file must be verified in the client portal in the detail of the shop connection by clicking the "Check for METHOD_NAME" button. After the green confirmation message is displayed, a request for domain registration with Apple is submitted to the system. Processing is automatic and is usually completed within 10 minutes. In exceptional cases it may take several hours, so it is recommended to wait at least 24 hours.

The apple-developer-merchantid-domain-association file must remain on the domain for the entire time Apple Pay is used in the e-shop cart. With every payment, Apple Pay accesses the file content.
Registration states
After validity is checked in the portal, automatic domain registration is initiated, which can take on the following states:
| State | Description |
|---|---|
| Enabled | Registration was successfully completed and the service is active. |
| Disabled | The service is disabled. |
| (waiting for registration) | The domain is waiting for registration processing, which will be performed automatically. |
| (waiting for re-registration) | The domain is waiting for re-registration processing, which will be performed automatically. |
| (disabled for the entire shop) | Apple Pay is disabled for the entire shop; details can be obtained via support. |
| (registration error) | An error occurred during registration. Recommended procedure: deactivate Apple Pay, save the change, then re-activate it and save. If the problem persists and the (re-)registration request is not processed, contact customer support. |
Google Pay
Unlike Apple, the process with Google is simpler. During development, the integration can be operated in test mode (details below) and only when deploying to production is it necessary to have the domain approved and switch the configuration to production mode.
Google Pay does not require placing a validation file on the domain, but it does require its approval in the Google Pay Console portal. The procedure is described in the official documentation. For this phase, setting up access to the portal is sufficient. As part of the Google Pay implementation, you will return to this step to perform domain verification and activate the production implementation.
Google Pay Merchant ID
When implementing the Web Checkout SDK in your own e-shop, it is essential to record the corresponding Merchant ID as part of creating the profile in the Google Pay Console. This identifier is then provided in the payment.googlePayMerchantId parameter during configuration of the Google Pay module.
The Merchant ID value can be found in the upper right corner of the Google Pay Console page header. The identifier is listed in the format BCR2AN9TWDNZ7G2L or similar.
Verifying the production domain
To verify the production domain, you need an account in Google Pay Console. After logging in, select "Google Pay API" in the left menu and in the "Integrate with your website" section click "+ Add website".
Fill in the URL (including the subdomain), select "Gateway" as the integration type and upload five screenshots showing the Google Pay payment process. These screenshots are used for approval by Google and must comply with the brand guidelines. Without meeting them, the integration will not be approved.
The button design can be generated in the simulator, however we do not recommend using these designs for approval purposes.
We recommend taking the listed screenshots from a computer:
- product selection – the user browses a product or service,
- pre-purchase screen – the user is ready to make a purchase,
- payment method selection – the user selects Google Pay,
- Google Pay payment screen – the user is shown the saved payment details. (Note: Android does not allow taking a screenshot of this screen, so use another device to capture it),
- post-purchase screen – the user has successfully completed the payment.
There are also certain requirements for the screenshots:
- Each screenshot can have a maximum size of 1 MB.
- One screenshot can be used for multiple categories if it matches the process.
After filling out the form, click the "Save" button in the bottom right corner and carry out a thorough check – once the request has been submitted, no changes can be made.
Scroll the page up and verify that you meet all the requirements:
- the first checkbox was completed by Comgate for you, so you can confirm it,
- the second checkbox – system verifications – is handled automatically by Checkout. Your only task is to ensure compliance with the brand guidelines, then you can confirm it,
- functional tests under the third checkbox were again performed by Comgate, so you can also tick the corresponding checkbox.
The website must not state that it is a test or demo environment. For the domain to be approved, it must present a fully production product.
Once you meet all the requirements for approval, submit the request by clicking "Submit for approval".
Failure to comply with the brand guidelines may result in suspension of access to the Google Pay service until remediation is performed. This process is fully within Google's authority and Comgate cannot influence it.
Troubleshooting approval issues
If Google rejects the approval request, it will send you an email with a detailed explanation and instructions on how to proceed.
In case of unclear points, you can contact Google customer support directly from the Google Pay Console portal via "Instant support" in the left menu. The response is usually received within 48 hours, with the first responses often being of a general nature – do not let this discourage you.
For problems with domain registration, always primarily contact Google support, because Comgate has no decision-making authority in this area and our customer support will likely refer any questions back to the Google Pay team.
Preparing the development environment
For successful integration, it is essential to have a properly prepared development environment that enables efficient implementation of the necessary features. Special attention is required when configuring the environment for the Apple Pay button.
HTTPS
The basic prerequisite for correct functionality is running the local project over HTTPS.
For projects using Vite, you can use for example:
@vitejs/plugin-basic-ssl– official Vite package [documentation]vite-plugin-mkcert– a suitable alternative [documentation]
For other tools, you need to choose your own solution.
Pre-registered development domain
For testing the Apple Pay process, Comgate provides two pre-registered domains that can be used during development. These domains were registered for your shop when Checkout SDK was activated and are ready for use.
This step is optional and is not required for the correct functioning of the Checkout SDK in the production environment.
However, without performing it, it is not possible during development on localhost to run the Apple Pay payment interface and test the entire payment process – not even for test transactions. The buttons themselves will be displayed.
Editing the hosts file
For local testing, it is essential to edit the hosts file in your operating system. Using the localhost address or a direct IP address is not supported by Apple Pay. On localhost with HTTPS, only the service buttons will be displayed.
For correct configuration, find out in the Comgate client portal which provider you are using for card transaction processing. The supported values are:
CARD_CZ_CSOB_2CARD_CZ_COMGATE
- CARD_CZ_COMGATE
- CARD_CZ_CSOB_2
Configure your development server (e.g. nginx, Apache, Vite.js, Next.js, ...) so that the following domain is assigned to the project:
Then edit the hosts file so that the listed domain points to your development machine (localhost).
- Linux
- macOS
- Windows
- open a terminal
- create a backup of the
hostsfile with the commandsudo cp /etc/hosts /etc/hosts.bak - open the
hostsfile with the commandsudo nano /etc/hosts - add the following line to the end of the file
- if you are developing remotely, use the server IP address (e.g. Docker) instead of
127.0.0.1 - save the file
- open the Terminal application
- create a backup of the
hostsfile with the commandsudo cp /etc/hosts /etc/hosts.bak - open the
hostsfile with the commandsudo nano /etc/hosts - add the following line to the end of the file
- if you are developing remotely, use the server IP address (e.g. Docker) instead of
127.0.0.1 - save the file
- in the
C:\windows\system32\drivers\etcdirectory, find thehostsfile and copy it to the desktop - create a backup of the
hostsfile - open the original file in a text editor
- add the following line to the end of the file
- if you are developing remotely, use the server IP address (e.g. Docker) instead of
127.0.0.1 - save the file and copy it back to the original directory (administrator permission is required)
After completing the configuration, the address should point to your development machine. Apple Pay and Google Pay should be ready for use.
If a production payment is used in the development environment (it was not created with the test=true parameter), there is a real risk of funds being withdrawn.
During development, it is therefore recommended to work primarily with test payments or with payments of small amounts.